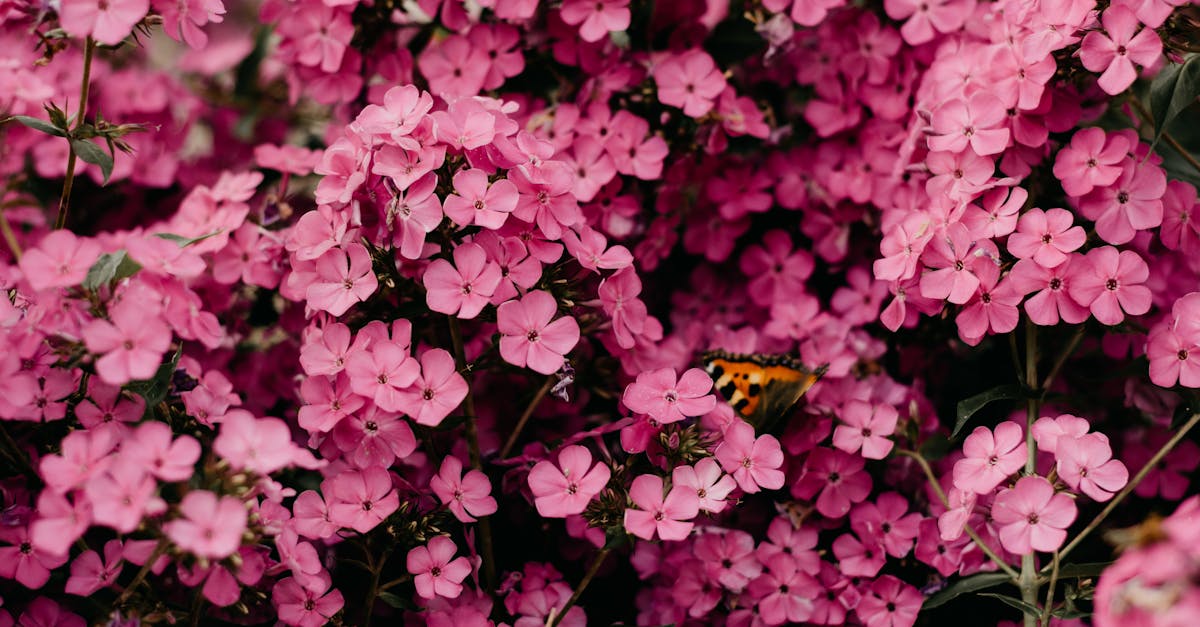
If you’re looking to add vibrant colors and delightful fragrances to your garden, growing phlox from seed is an excellent way to achieve that. Known for their brilliant blooms and sturdy nature, phlox plants are a favorite among gardeners. This comprehensive guide will walk you through every step of the process, making it easier than ever to cultivate these stunning flowers in your own backyard. Whether you’re a seasoned gardener or a novice, our easy-to-follow instructions will help you successfully grow phlox from seed and enjoy the beauty of these perennial staples in your summer garden.
Understanding Phlox Species
Phlox is a diverse genus featuring over 60 species, ranging from creeping ground covers to tall perennials. These plants bloom in an array of colors, bringing vibrant life to gardens. When selecting phlox for your garden, consider factors such as climate and soil type, as different species thrive under varied conditions. For instance, Phlox paniculata is perfect for sunny borders, while Phlox subulata is more suited for rock gardens. Their adaptability and ease of care make them a popular choice for both novice and experienced gardeners.
Types of Phlox Plants
Phlox plants are categorized into several species, including garden phlox, moss phlox, and creeping phlox. Each species presents unique characteristics and benefits, catering to different gardening styles.
Choosing the Right Species for Your Garden
To thrive, select a phlox species that matches your garden’s environment, considering factors like light and soil conditions.
Plant Characteristics and Growth Habits
Phlox plants generally exhibit bushy growth with sturdy stems. They can vary in height and bloom time, ensuring attractiveness throughout the growing season.

Preparing the Soil for Planting
To successfully cultivate phlox, the first step is preparing the soil. Begin by testing your soil to determine its nutrient composition and pH level. Ideal soil for phlox should be rich in organic matter and well-drained. If your soil is heavy clay or lacks fertility, amendments like compost or well-rotted manure can significantly enhance its texture and nutrient content. Aim for a slightly acidic to neutral pH, ideally between 6.0 and 7.0, as this will encourage optimal growth and flowering. Remember, a solid foundation will yield a vibrant crop, making your journey of growing phlox from seed rewarding. Start off right for robust blooms!
Soil Requirements and Testing
Testing your soil is essential to assess its nutrients and pH, ensuring it’s suitable for phlox.
Improving Drainage and Fertility
Add compost or organic amendments to enhance soil drainage and nutrient levels.
Optimal Soil pH Levels
Maintain a pH between 6.0 and 7.0 for best results in growing phlox.

The Process of Sowing Seeds
Sowing phlox seeds can transform your garden into a vibrant haven. To initiate the growing process, it’s crucial to determine the right timing; late winter or early spring can be ideal. Indoor sowing typically requires starting seeds 8-10 weeks before the last frost, allowing for earlier blooms. Outdoor sowing follows suit once the soil is warm enough, within a few weeks after frost risk passes. The key techniques for sowing include scattering seeds on the soil surface and lightly covering them. Once sown, maintain adequate moisture—keep the soil consistently damp without over-saturating. Proper lighting is also critical; place them in bright indirect light to foster strong growth and ensure healthy seedling development. This process enhances the chances of successfully growing phlox from seed.
When to Sow Phlox Seeds
Timing is essential; sow indoors 8-10 weeks before the last frost or outdoors after the frost risk.
Sowing Techniques: Indoors vs. Outdoors
Indoors requires starting in seed trays, while outdoor planting involves direct sowing on prepared soil.
Watering and Light Needs
Keep soil moist and provide bright indirect light for optimal seed germination and growth.

Caring for Seedlings
Caring for seedlings is crucial to successful phlox cultivation. Begin by thinning seedlings once they develop their first true leaves, ensuring plants have enough room to grow. Transplant them into larger pots to promote healthier roots. It’s vital to protect young plants from pests such as aphids and diseases like powdery mildew; consider using organic insecticides or companion planting as preventive measures. Additionally, seedlings require proper nutrition to thrive. A balanced fertilizer should be applied every four to six weeks to ensure they get sufficient nitrogen, phosphorus, and potassium. With these care tips, your seedlings will be well on their way to becoming robust phlox plants, enhancing your garden’s beauty.
Thinning and Transplanting Seedlings
Once seedlings show their first true leaves, thin them to prevent overcrowding, allowing each plant to thrive. Transplanting them into larger pots is essential for root development.
Protecting Young Plants from Pests and Diseases
Implement organic measures to shield seedlings from pests and diseases. Monitoring plants closely will help address any issues early, preserving seedling health.
Nutritional Needs and Fertilization
Feed seedlings with a balanced fertilizer every four to six weeks, supplying essential nutrients for vigorous growth.

Transplanting Outdoors
Successfully transplanting phlox outdoors is crucial for beautiful blooms. The best time to transplant is in early spring or early fall when temperatures are mild. Preparing the planting area with well-draining soil enhances root establishment. To ensure the integrity of your plants, gently remove them from their nursery containers without damaging the roots. Keep the soil intact around the root ball to reduce shock. Additionally, water the transplants thoroughly post-planting to promote moisture retention and encourage growth. Following these best practices can lead to vibrant displays of phlox, making your garden an eye-catching sanctuary. To achieve optimal growth, consider tips for growing phlox from seed, as proper care will yield stunning results.
Choosing the Right Time for Transplanting
The ideal period for transplanting phlox is in early spring or early fall, providing the plants with the best chance to thrive.
How to Transplant Without Damaging Roots
To avoid root damage, carefully remove phlox from their containers while keeping the root ball intact, ensuring minimal shock.
Best Practices for Transplanting Phlox
Utilize well-draining soil when transplanting phlox and consistently water them after to promote quick establishment.
Maintaining Your Phlox Plants
To ensure your phlox thrives, establish a consistent watering routine, especially during dry spells. Maintaining moist, well-drained soil is crucial, with watering needs varying by climate and plant maturity. Use mulch to conserve moisture and regulate soil temperature. Beyond hydration, apply pruning and deadheading techniques to encourage growth and flowering. Regularly trim back spent blooms to foster new growth and minimize disease risks. Moreover, be vigilant against common pests such as aphids and spider mites; employ organic solutions like neem oil for control. With proper care, you can cultivate vibrant phlox blooms and maintain their health throughout the growing season.
Watering Routines and Considerations
Establish a watering schedule that keeps soil consistently moist but not soggy. Adjust based on weather and plant size.
Pruning and Deadheading Techniques
Cut back faded flowers and trim stems to promote robust regrowth, enhancing bloom production.
Common Pests and Disease Management
Monitor for pests and apply organic remedies, ensuring plants stay healthy and vigorous.

Harvesting Seeds for Future Planting
Harvesting seeds is crucial for preserving your favorite phlox varieties. Firstly, it’s essential to identify mature seed heads, which typically turn brown and dry. Timing is key; seeds should be collected just before they disperse to ensure a high germination rate. Once identified, gently twist the heads off and place them in a paper bag, allowing them to dry further. For proper seed collection and storage, label the bags with the variety name and date for easy identification later. Store the seeds in a cool, dark place to maintain their viability until next season’s planting. Following these steps will help ensure a thriving garden filled with beautiful phlox flowers, whether you’re growing phlox from seed or transplanting seedlings.
Identifying Mature Seed Heads
Look for brown, dry seed heads that are just about to open.
Proper Seed Collection and Storage
Twist mature heads off, place in a paper bag, label, and store in a cool place.
Preparing for Next Season’s Planting
Plan your planting strategy based on last season’s growth and seed viability.

Conclusion
In conclusion, growing phlox from seed can be a rewarding experience that enhances your garden’s aesthetic appeal. By following the detailed steps outlined in this guide, you can cultivate these vibrant flowers with confidence. Don’t hesitate to experiment and enjoy the process of nurturing these beautiful plants from seed to bloom!